Saturday, March 17, 2012

Berries & Cream Cheese Crescent Wrap-Ups

The most deliciously sweet breakfast I have ever made.

The mouthwatering blueberry-strawberry crescent roll wrap ups.


This is a very simple spin off of Lauren Brennan's Easy Blackberry Cheese Danish.

This is very quick, easy and SO tasty!

Ingredients

1 tube Crescent rolls
8 ounces cream cheese, softened
1/2 cup Sugar
1/2 T Cinnamon
1 t Vanilla Extract
1/2 cup fresh Blueberries
1/2 cup chopped Strawberries


Roll out your crescent rolls and press them together.  Then whip-up the cream cheese with with your cinnamon, sugar, & vanilla extract:

Keeping the edges free begin filling in the middle.  Simply spread your cream cheese mixture onto your pressed out crescent roll and top it with your blueberries and strawberries.

Cut three quarter inch slits down the side of your crescent rolls and wrap those slits up over your berries and cream cheese.

Bake for 15-20 min at 375 degrees Fahrenheit.


ENJOY your sweet & delicious creation!


The original recipe calls for an icing on top, but my husband and I found that this was sweet enough without that

Banana Nut Bread Mug Cake

So mouthwateringly sweet and simple!


Banana bread is BY far one of my all time favorite baked good.  When I was craving it in the middle of my work day on a super busy week, I knew I would not be satisfied until I had some...only problem is, I can't make a whole loaf because my husband is much healthier than I and is not a carboholic like myself, so I knew I would be eating most of the loaf...which doesn't need to happen.  So I resorted to a mini portion.

I looked on the web for banana bread in a mug cake and didn't find one recipe that just stuck out, so I used the staples from my Blueberry & Coconut Mug Cake and created my Banana Nut Bread Mug Cake!


Ingredients

3 T Flour
1/2 t Baking Powder
2 T White Sugar (or Honey)
1/2 t Brown Sugar
1 Banana
1 Egg
1/4 t Vanilla Extract
1/4 cup Chopped Walnuts

T = Tablespoon     t = teaspoon 

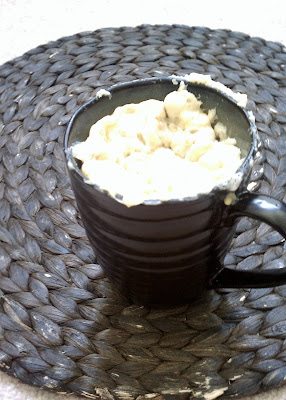
Mix the flour, baking powder, and sugars.  Then cut your banana into pieces and mash into the mixture.  Then add an egg and mix well.  Stir in your vanilla and pile on the chopped walnuts, stirring slightly!

Heat for 2 minutes in the microwave and enjoy!

Totally wish I had taken better pictures, but I was too excited to eat my banana nut bread mug cake!


This was SOOO sweet that I think you could maybe just do 1 tablespoon of sugar


Juicy Steak Topped w/ Caramelized Onions & Mushrooms

I recently learned how to make caramelized onions...you just cook them slowly on a low heat with a little salt and a little oil...(I added honey for sweetness) super easy.  Only thing, is you need patience.

So for dinner...my husband had some really yummy NY strip from the Fresh Market that he grilled  so lovely for us.

I stayed indoors and  attempted my creation of caramelized onions and then sauteed them with fresh mushrooms! 


Ingredients
Steak (we used NY Strip from Fresh Market)
Mushrooms
Onions
Salt
Olive Oil (extra virgin/not pictured)
Honey
Pepper to taste
Parmigano Regiano (Parmesan cheese)

don't forget a veggie or other side dish - microwave steamed broccoli was just perfect for us!
To make the caramelized onions, I started by heating a pan on low/medium and adding a "swirl" of extra virgin olive oil


Then I cut my onion into strips and added that to the EVVO.  I added about a tablespoon of honey (best ingredient choice!), a little salt and pepper for seasoning and cooked for about 20 min on low:

Then I sliced my mushrooms and added them to the onions:
  

 To top it all off, I chunked some fresh parmigano regiano (Parmesan cheese) and served with steamed broccoli.

Dinner is served!

Tuesday, March 6, 2012

Homemade Compost

Friends of ours made a compost a year ago and I have been asking my husband for one ever since. 

This Valentine's day he surprised me and said we were going to Lowes to pick out wood and build a compost!!!

I had originally wanted a pallet one like this one here.  However, I am much more pleased with what he created!

We purchased the following items:
  • Treated Dog Ear Fence Pickets (12 of them)
  • Treated 2x4s (5 8ft ones)
  • Treated 4x4s (2 6ft ones)
  • Box of 1.5 in Galvanized Nails
  • 2 Hinges
  • 1 Gate Latch
Our total came right around $60 and we had a gift card for $30!

I wish I had taken more "work in-progress" pictures, but this was his project for me :)

First he made a frame our of the 2x4 and 4x4s (the 4x4s were the vertical corner pieces and the 2x4 are the horizontal part of the frame...two between each corner post)


On the outside of the frame he attached 6 of the dog ear picket fence posts.  He cut each picket fence in half and then dog eared (cut the corners) all of them to match.  That means three picket fences were used on each side.


He placed the compost and dug down the corner posts.

Then he put the hinges on with the front door slightly off the ground. And attached the latch.


Layering your compost
My husband looked up the process of layering a compost properly.  He called it brown layers and green layers.
First he dug up the dirt and laid down some wood chips and put the dirt back on top. 

Then he put some of our compost we have compiled over the past year in the 5 gallon bucket (by the way, don't put your compost in a bucket that has not holes...compost needs oxygen and our bucket of compost smelled HORRIBLE...a compost should NOT have a smell.

He put more brown layer (dirt, wood chips, grass clippings, etc). And then more of our green layer (egg shells, banana peels, coffee grounds, stems from fruit, etc). He continued to do this until the compost was full of our current materials.
I am very proud of our compost and I can't wait for it to develop into lovely usable tops soil for planting.

Sunday, March 4, 2012

Greek Yogurt & Strawberry Parfait

This morning my hubby and I needed a protein fix.  Thus I made us a breakfast parfait and some over medium eggs!

Yummy, right?  (above is my husbands, he had a double serving)


Yogurt Parfait Ingredients (single serving)

1/2 Cup (4 oz) of Greek Yogurt
Strawberries (I had HUGE ones and used 2)
1 Tablespoon Wheat Germ
1/3 Cup of Kashi Go Lean Crunch

My husband's serving is on the left and mine is on the right:


And I topped off breakfast with a fresh brew of french roast, topped with frothed milk and cinnamon!


Wine Cork Board from a Multi-Use Frame

Way before the times of Pinterest, I fell madly in love with my dear Aunty Jo's Wine Cork Board.  She is one of the most resourceful and crafty people I know.  Her Wine Cork Board is beautiful, intricate and MASSIVE!  She used the frame of an old door to make her Wine Cork Board.  Yes, a door!  That's a lot of wine!  Her, her husband, his co-workers, and friends had been collecting corks for years. 

Summer 2008 was when I started to collect wine corks, and I finally made my board in a 2ft x 3 ft picture frame in 2011. 

First, I picked my frame.  I got it for $10 dollars on uber clearance at Hobby Lobby. 

This frame was first used at my bachelorette party in 2010:
(the photo wall was made of 2 different wall papers.  The girls all wrote me notes on the pink paper - some funny, some sweet, and some inappropriate ;-) And from the ceiling hung ribbon in black and pink! Super cute!)


Then this frame was used again at  wedding as a chalkboard menu (I used a very cheap foam board and sprayed it with chalk paint and had my friend with much cuter handwriting write our our menu):


Now time to get to my Wine Cork Board.

Here's materials I needed to attach a permanent backing to my frame.  A hammer, a flat-head screw driver and glazier point push pins, and a think piece of wood - you can get an associate at Lowe's to cut this to size.


I put the board on the back of my frame and hammered the pins in at an angle in every corner and a few on every side.


Here's a full view from the back, you can see the pins hammered into the frame.


And a closer view from the side:

 First I laid out the corks, I didn't follow your normal 2 by 2 pattern.  I just went with it:

And hot glued them into place:


Lastly I hammered in two large sawtooth picture frame hangers at a distance where I would hit studs in my wall (the frame is indeed heavy):


And my finished product!  Proudly hanging between our living room and kitchen:


To see my 2nd Cork Board Project (even prettier!) click here!