
I am very excited to celebrate Neal’s and my two year
wedding anniversary! The past two years
have been filled with love, celebration, happiness, adventure, and some trying
times. We have grown so much in our
appreciation for one another, maturity, and outlook on life and what the future
holds. I am so very blessed to
experience life with Neal!
This past year we have:
- made new friends
- shared new experiences (like climbing a mountain)
- got a little brother for Sasha (who broke his paw)
- visited my mom in Florida and went to Disney's MGM/Hollywood Studios
- laughed, loved and cried together
- began to grow together in religion
- constantly learned new things about one another
- and grew in our love for one another
I want to take a look back at the day that changed our lives forever, our wedding day!
Even though our wedding was before the times of Pinterest, I feel I had a great handle on the DIY and budget savvy ways.
Instead of having a 'board' to post wedding inspirations, I, like many brides before Pinterest, had links saved and a word document of all my inspiration photos created.
The majority of our wedding consisted of intricate details I
put together; we will call these my DIY wedding details. Some were done by me, some friends and
family, and others lovely business owners on etsy.Even though our wedding was before the times of Pinterest, I feel I had a great handle on the DIY and budget savvy ways.
Instead of having a 'board' to post wedding inspirations, I, like many brides before Pinterest, had links saved and a word document of all my inspiration photos created.
Some details about the pictures below:
- Location = Twin Cedar Farms, Maryville, TN
- Photographer = Tiffany from Shutter Sprite Photography
Invitations
Hand drawn
by a friend and printed at a local print shop (less than $200 with postage!) She took an image of our hand and drew it out. We used that throughout the wedding

Bridal party flowers 
Hand made
by Kraft Paper Scissors (I put together the cork board w/ the names of our attendants)


Bridal party jewlery
Handmade by JoceyLynn

Ceremony announcement fans
Designed by
me and printed, cut and bound by a company online...looking for the info!
Burlap aisle runners
Designed
and made by my mom and me. The burlap and petals were cheap. Burlap bought with a coupon for a small price (can't remember) at Joann's and the petals off of eBay for 2 packages of like 1000 or so petals that came to less than $15 with shipping
Flowers for aisle seats
Designed and made by me from leftover burlap and some DIY flowers made by me. These flowers were then gathered and used as my tossing bouquet.
Designed and made by me from leftover burlap and some DIY flowers made by me. These flowers were then gathered and used as my tossing bouquet.

Bubble tags
Designed
and printed at home and put together by me. The bubbles were $15 for 100, I bought 200 so that was $30 plus twine I already had and printing from home.


Ring bearer and flower girls
My pseudo grandmother made the ring barer pillow, and I found baskets at my dads house and put ribbon around them for the flower girls. That make this part almost FREE. I also made the girls' flowers in their har.


Umbrella
The bridal party all arrived by horse drawn carriage. I am not going to lie, I was totally against this, but finally gave in. I thought it was to 'fancy' and 'hoaky' for me, but I absolutely loved it and the pictures we got of us and the bridal party. I used the umbrella so no one could see me on the long carriage ride from the reception barn to the ceremony location. I bought a cheap umbrella and put big pearls on it that I had found in the scrapbook or sticker section of a craft store.

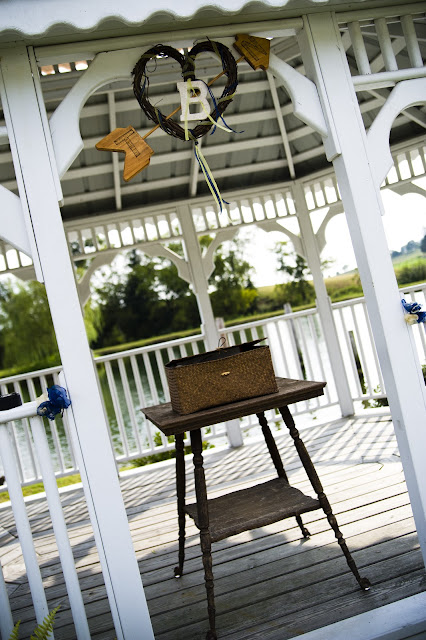
Wine, box and love letter ceremony
I found this online by searching for unique wedding ceremonies. This, again, was before the time of Pinterest. I found the ceremony wording, but no pictures. This is how ours turned out! We also added to this box, letters from our guests with words of encouragement - well wishes. We have yet to have any trials and have not opened our box, but plan to do so at our five year. Tradition of this goes, if you are having difficulty in your marriage to open the box and remind each other why you are together and mend what you can in the marriage. I sincerely hope we do not have to open this until our planned 5 year...3 more years til that!



Chalkboards for food and messages
Designed by myself and my bridesmaids see here for more on the making


Flower petal and sparkle strands
Very easy to make with hemp string, some gems, flower petals and glue dots!

Cake stands from tree stump and cake toppers
My dad created the stands, I bought the shutters in the back (3 of them for $5 a pop at Goodwill) and spray painted them, then I used a wood burner to make the tops and our caterer decorated the cheescakes as well as provided a cheescake topping station. We had Cheescake Factory cheescakes from Sam's Club for about $10 each, talk about doing it yummy and on the cheap!


Bratton Sign
On the bar area we had our hand image created into a vinyl by ten23designs for less than $25

Food and Catering
We had an amazing caterer, this was a friend of a friend who has a business with her family. We wanted a family style dinner: one big bowl of salad to share, bread baskets, bowls of salad to share, all at a simple table with visibility of all guests for conversation. She created all of this, including the table linens, for less than $14 a person! Now that's a DEAL!


My garters
Designed and created by me out of ribbon and elastic. I loved how they turned out!


One dress shot
...because I love it so much (Melissa Sweet, Larissa)

And the most important detail...getting a husband and friend for life! I LOVE YOU NEAL!

What are some cost saving or DIY wedding tips you have heard or even have used?


Ring bearer and flower girls
My pseudo grandmother made the ring barer pillow, and I found baskets at my dads house and put ribbon around them for the flower girls. That make this part almost FREE. I also made the girls' flowers in their har.


Umbrella
The bridal party all arrived by horse drawn carriage. I am not going to lie, I was totally against this, but finally gave in. I thought it was to 'fancy' and 'hoaky' for me, but I absolutely loved it and the pictures we got of us and the bridal party. I used the umbrella so no one could see me on the long carriage ride from the reception barn to the ceremony location. I bought a cheap umbrella and put big pearls on it that I had found in the scrapbook or sticker section of a craft store.

Wine, box and love letter ceremony
I found this online by searching for unique wedding ceremonies. This, again, was before the time of Pinterest. I found the ceremony wording, but no pictures. This is how ours turned out! We also added to this box, letters from our guests with words of encouragement - well wishes. We have yet to have any trials and have not opened our box, but plan to do so at our five year. Tradition of this goes, if you are having difficulty in your marriage to open the box and remind each other why you are together and mend what you can in the marriage. I sincerely hope we do not have to open this until our planned 5 year...3 more years til that!


Heart and arrow
My mother made this for us and it now proudly hangs on our front door!


Designed by myself and my bridesmaids see here for more on the making


Flower petal and sparkle strands
Very easy to make with hemp string, some gems, flower petals and glue dots!

Cake stands from tree stump and cake toppers
My dad created the stands, I bought the shutters in the back (3 of them for $5 a pop at Goodwill) and spray painted them, then I used a wood burner to make the tops and our caterer decorated the cheescakes as well as provided a cheescake topping station. We had Cheescake Factory cheescakes from Sam's Club for about $10 each, talk about doing it yummy and on the cheap!

My friend, Emily used the cake stands at her wedding too! Her sister made the cake and wedding planner, Tiffany, decorated it! So adorable!

We had GarrityGal on etsy create the Groom Cake topper, I love how Sasha is on it! I made the sign 'The Honeymoon Awaits'. GarrityGal is no longer on etsy.

Koozies
We bought 200 of these from a company online for less than $1 a piece


Bratton Sign
On the bar area we had our hand image created into a vinyl by ten23designs for less than $25

Food and Catering
We had an amazing caterer, this was a friend of a friend who has a business with her family. We wanted a family style dinner: one big bowl of salad to share, bread baskets, bowls of salad to share, all at a simple table with visibility of all guests for conversation. She created all of this, including the table linens, for less than $14 a person! Now that's a DEAL!


My garters
Designed and created by me out of ribbon and elastic. I loved how they turned out!

And this is probably the best ever picture of our friend catching the garter!

One dress shot
...because I love it so much (Melissa Sweet, Larissa)

And the most important detail...getting a husband and friend for life! I LOVE YOU NEAL!

What are some cost saving or DIY wedding tips you have heard or even have used?


