Showing posts with label Decorating. Show all posts

Tuesday, June 9, 2015

Father's Day 2015

I wracked my brain over and over about what to do for my husband this year for Father's Day.  And then I thought, okay now I have WAY too many options, so I'd like to share :)

Here's 4 options for you - and you have time for ALL of these before Father's Day, Sunday June 21st! 


  1. DIY Projects you can do LAST MINUTE! 
    Yes, completely last minute projects for all of us that are busy just trying to get through the day and then suddenly realize…oops I need a gift!  Here’s a few to inspire you!
    From a photo mug to personalized hand and foot prints. 
    *Remember, when you are doing hand or feet prints, tickle the back sides of the baby’s hand or foot to get them to open them up for you!
    Check out these DIY Gifts here
  2. Some favorites from sellers on Etsy
    I believe all of these shops are stocked and ready for YOU to get a gift for your dad or husband in time for Father’s Day!
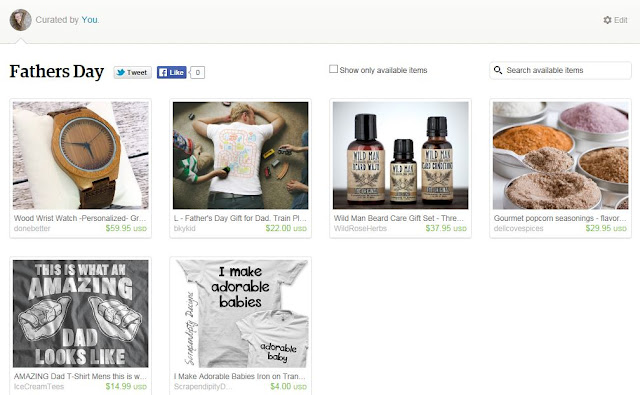
    One of my favorites from these sellers is“This is what an awesome DAD looks like tee”.  Even more fun… the Train Play Mat T-Shirt.  Want something a little different? What about a wooden watch or some delicious popcorn seasonings?  Or get him a beard grooming kit (I’m a sucker for my husband when he has a nice soft beard…I know you may want your man freshly shaved – no judgment!)
    Enjoy my list here!

  3. Or get them something customized from me!
    I hand stamp guitar picks (which can be used or turned into a keychain), money clips, fishing lures, and collar stays.
    I’m just asking all orders be in by Wednesday, June 10th so I have time to make your man something uniquely special from your heart! Check out the options by clicking HERE
4. Lastly, for a SUPER cool gift that comes Man Crates.  They come packed up with no extra fluff.  It is an awesome box with great products and a crowbar to open it...how cool is that!?


I hope you enjoyed this collaboration! I can’t wait to see what you do for your dad or husband this Father’s Day!  Tag me @LivelyHappenings to let me know!  I may have to snatch up your ideas as well!

Monday, December 22, 2014

Cookies for Santa!

This holiday season is going to be especially wonderful with the addition of our little girl!  She's not quite sure who Santa is yet at this point, though she did get to meet him!


I wanted to gift her caregivers something sweet for the holidays, and remembered how much I LOVED making cookies in a jar a few years ago for some friends and family!  They are seriously THE BEST cookies I've ever had.  I REALLY love them and get compliments any time they are gifted!  I hope the daycare girls love them as much as I do!

They turned out beautiful!  I created labels for them and printed them on some of the brown cardstock I had here at home. 


You can use these and print them yourself too!  Select the link itself to get the downloadable and printable version!


For the tags, I printed one side with Santa and the other side with the recipe. I use bakers twine to attach the tags and the bags of pecans to the jar.


Here's the full recipe I used for the cookies (originally on Bakerella - Cowgirl Cookies)

These are the ingredients you need to add in this specific layer into a large mason jar (1Quart size)
  • 1 1/3 cup all purpose flour, spooned into measuring cup & leveled
  • 1 teaspoon baking powder
  • 1 teaspoon baking soda
  • 1/4 teaspoon salt
  • 1 cup cooking oats
  • 3/4 cup m&ms
  • 3/4 cup semi-sweet chocolate chips
  • 1/2 cup brown sugar, packed
  • 1/2 cup white sugar
  • 1/3 – 1/2 cup chopped pecans
***If the nuts don't fit, do not fret!  You can do like I did and add them on the side in a little Ziploc bag!  I sometimes don't pack it down enough, so I add a little extra sugar to fill space.

These are the ingredients you're recipient will need to add once they've gotten their gift!
  • 1 egg, slightly beaten
  • 1/2 cup melted butter
  • 1 teaspoon of vanilla
I always make myself a batch while I'm putting these together!  I just mix all my dry ingredients, add my wet ingredients and roll them into little balls.  From there I freeze all but a few on a baking sheet. Once they are frozen, plop them all into a large Ziploc bag so you can enjoy just one or two at a time.  They just take a few extra minutes to bake up in the oven!

To make them for yourself while packing some up in mason jars for gifts, after you've mixed your ingredients and made your cookie balls, heat the oven to 350 and bake for 8-10 min.  Enjoy!

Now go make some delicious cookies or put some together in cute mason jars for your friends and family!

Now when Santa comes, don't forget carrots for the reindeer ;)

QUESTION FOR YOU!
What are your favorite Christmas Cookies?

Wednesday, August 13, 2014

Braelyn's Mountain / Woodland Themed Nursery

There are locations all of us visit that hold special places in our hearts.  For some, it may be grandma's house, the little ocean town your family went to nearly every summer, perhaps it's a park you played at as a child or even with your own children.  For me, the mountains hold a special place in my heart.  My particular mountains are those found out in Wyoming, the Grand Tetons. 

When I think of these beautiful mountains, with their rough and pointy peaks which seem to pop out of the land with power and authority, I am humbled.  God was at work in these mountains.  He was at work in my heart when I lived near these mountains.  They are forever special.

When I thought about how I wanted to decorate our little one's room, I knew I wanted to bring some of what inspires me the most to our little bundle.  I hope she grows up with a curious spirit that allows her to explore the great outdoors.

For my inspiration on Braelyn's Mountain / Woodland Themed Nursery, check out this post.

And now for what I've been dying to share with you, Braelyn's nursery / our guest room!!!


Every single piece of art that's hanging on the wall is either in a stud, or anchor, some even both!  Neal took extra care in making sure things were sturdy.  

Want Digs Like Braelyn?  Here's Where to Go!

  • The dresser and crib are from Ikea.  I changed the dresser by putting white wall vinyl on the drawers and getting knobs from Hobby Lobby that I spray painted gold!
  • The pillows on the bed are from Hobby Lobby, except the front long pillow, I made that, see how in this post.
  • The curtains, chevron blanket on the bed, both rugs (faux sheep skin and striped), are from Home Goods/TJ Maxx.
  • Above her dresser, the wolf head is from Home Goods.  The two frames are from Hobby Lobby.  The art in them is from Etsy, you can still find the gold fox print (and other great prints) from Mint Peony Designs and the moose head is also from Etsy, White Faux Taxidermy.
  • To the left of the dresser are black and gold antlers found at Hobby Lobby.  They are holding my Planet Wise Wet/Dry bag (for cloth diapering).  I also got a similar bag in "Oh My Deer", both from Amazon.
  • On top of her dresser is the Summer Infant Contour Changing Pad from Target (yes, still waiting on the cover to arrive!), the Squirrel is a stuffed animal from a local children's store in downtown Newburgh, IN that Neal and I picked up after our first ultrasound, and the little fox moccisans are from Starry Knight Designs on Etsy, which we picked up during our vacation in Montana at a baby store in downtown Whitefish!
  • The glider is the Babyletto Madison Glider in Ecru, you can find it on Amazon.  To me, it's the perfect size for our small space.  There wasn't a lot of room since we had a queen size bed to work around!
  • The pillow sitting on the chair, "Oh Baby It's a Wild World", is from Cut4You on Etsy.
  • The book, "Do Princesses Wear Hiking Boots" (a gift from my in-laws to Braelyn when we went to Montana this summer) sits on a custom made table, I took a $9 table from Michaels, spray painted it gold, and screwed a slab of wood across the top.
  • To the right of the chair, peeking out behind the curtain is a cute little bear Neal and I picked up at a craft show in Whitefish, MT on vacation this summer.
  • Above the chair is a bear head, another White Faux Taxidermy design that I mounted on a round wooden piece I purchased at Michael's and painted gold and black.  To the left of that is a very special note from my father and his girlfriend Kim along with a token she kept with her while serving in Iraq.
  • Beside the guest bed is a custom art work I made "The Mountains Are Calling and I Must Go", which is my favorite saying.  I used an old cabinet door we salvaged from Neal's parent's house when they were remodeling.  Underneath the art work is a banner I made from tying ribbons together that I purchase for less than $8 at Hobby Lobby.
  • Braelyn's crib skirt and crib sheets were made by me.  You can get the fabric for the foxes here and for the arrows, here.  If you don't want to make them, the arrows are normally available on a few different people's Etsy websites in crib skirt, fitted sheet, changing pad covers etc.
  • Above Braelyn's crib is a photo of Neal and myself printed on wood.  Our photographer was Scott Wilson out of Kalispell, MT.  The print was done by PhotoBarn.
  • The mobile was custom made by myself and my wonderful friend, Hope.  She is an artist and helped me by designing/cutting all of the animals out.  I sewed and stuffed them.  Her and my brother got the tree branch.  My dad's girlfriend, Kim and I strung all of the animals and the chain.  My father and husband found the stud in the ceiling (Neal even put all his weight on it) and hung it very securely in the same fashion he had hung a 100lb kickboxing bag in our garage.  This was a family affair piece!
What is your favorite part of her room?  I'm sure I'll move things and change it up, and it'll never be this clean again, but for the time being, It'll remain my favorite room in the house.  I can't wait to have Braelyn here so she can check it out herself!

Thursday, July 3, 2014

Baby Room Inspiration, Mountain & Woodland Theme

Well before we ever found out the gender of our sweet little one, I started imagining the nursery.  My heart and mind kept being drawn back to the same place. It didn't take long for me to start putting the pieces together and imagine the perfect room for our baby.

The mountains were calling out to me, and I knew the nursery, whether boy or girl, would be mountain inspired and woodland themed!

For years, I've been wanting a moose head in my house after seeing a contestant use one on HGTV's Design Star, and this was perfect!  No not a real moose head, a cute fake one!
Moose Head, Design Star Contestant Rachel Kate (source)

The search began with me originally wanting this crib because it was oh so perfect, but alas I could never find this type of chunky rustic crib.
source
Then I realized how stupidly expensive cribs were, and was overjoyed when I came across this post on a "Neutral and Calming Nursery" and all the items were perfectly affordable and from Ikea!


My father and some close friends got us this dresser and this crib in the grey brown color.

If we were having a boy, the plan was to go with the grey-brown color, whites and reds.
If we were having a girl, the plan was to go with he grey-brown color, white, black and gold.

When we found out our little one was a girl, it was game on!  I quickly put together these inspiration boards and fell in love!


And then I purchased these fabrics to make crib sheets and a crib skirt.
  • Menagerie in Timberwolf by Sarah Watson found here
  • Trotting Foxes by Olive and Andrew found here 
  • Light Grey Arrows by Holli Zollinger found here

Olive and Andrew used to have a shop on Etsy, that's where I first found their fabric made into crib sheets, but then their shop closed, so that's why I knew I had to just make these crib sheets because I was that obsessed.

Practically all of these items in the above photo inspiration boards are available on Etsy.  Here's the links to get many of them yourself!


  • Crib sheet with animal faces found here
  • Moose Head in Gold Found here
  • The Mountains are Calling and I Must Go plaque found here
  • Metallic Gold and White fabric color combos for crib sheets found here
  • Oh Baby It's A Wild Word pillow cover found here
  • Gold and White fabric combos for crib sheets found on Etsy, no longer can I find this listing
  • Heart Pillow found here
  • Gold Antlers to hang items from found here
  • Let Her Sleep For When She Wakes She will Move Mountains print found here 
  • White and Gold Polka Dot Blanket found here
  • Gold Wolf Head found here
  • That's the Ikea Dresser we with custom painted drawers and knobs.
  • The Gold Deer Head pillow cover found here
  • The Trotting Foxes in gold fabric - see fabrics above by Olive and Andrew :)
That's our little one's nursery inspiration in a nut shell!  I hope you enjoy this inspiration and I cannot wait to bring you our final designs for our little girl! I have some more vacation time here in the mountains, and upon my return home, I'll be putting all of these pieces together + more to bring you Braelyn's Mountain & Woodland Inspired Nursery!!!

Monday, June 9, 2014

Brewing a Baby Shower!

Last weekend, I was thrown a beautiful and fun baby shower from my friends, Natalie and Hope!


First, Hope and Natalie brainstormed to make the CUTEST invites for us!  We wanted it to seem more like a casual lake day than a baby shower since it was a couples shower.  Hope is an artist and used her mad skills to make these bad boys!  I LOVE how they turned out!  Natalie suggested the book instead of a card, and I loved it!  Baby Bratton has some great books already!  I cannot wait to read to her!

DECOR:

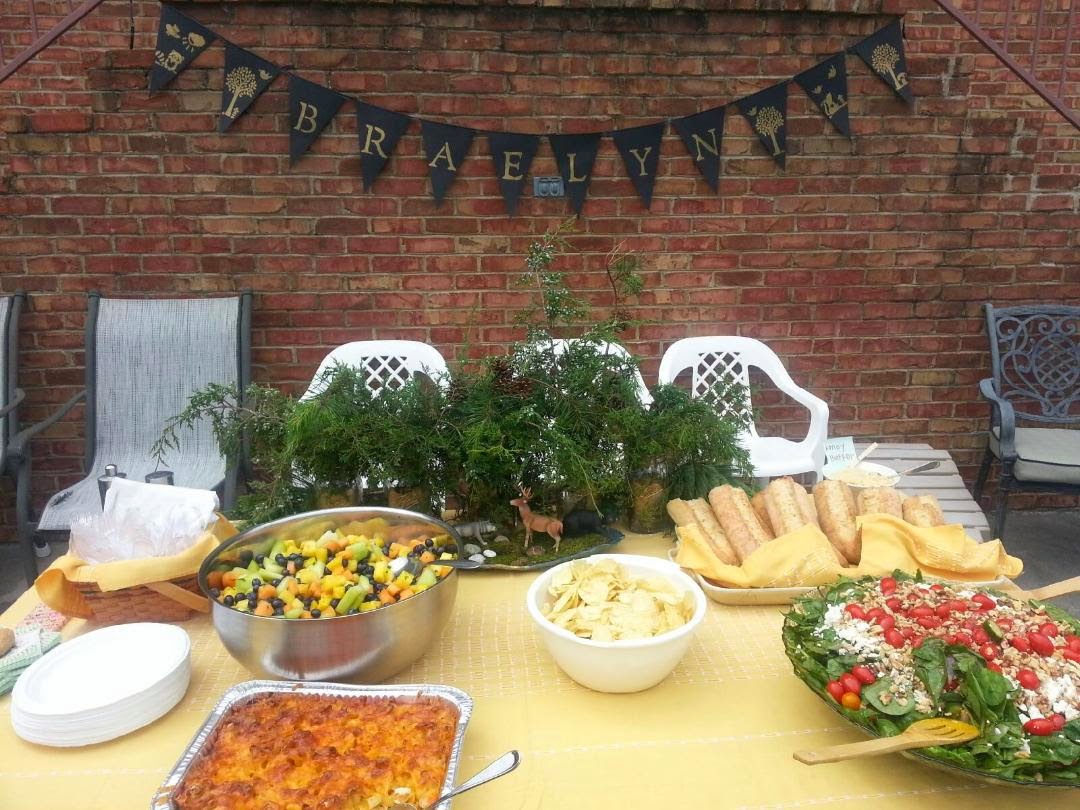
Hope and Natalie were going with the woodland theme, which is what will be Braelyn's nursery/our guest room.  Hope gathered lots of lush evergreens and pinecones to put in large mason jars. Natalie got cute little woodland animals and they put them alongside this lush moss.  

She was originally going to paint them gold, but then we all liked the natural colors of the animals.


Natalie also made the cute sign that was behind us as we opened all Braelyn's presents.  Making the cutest backdrop for our shower photos!

FOOD:
To keep it casual, we had some amazing food Hope and Natalie prepped ahead of time all laid out for the guests on the patio table.  The day of, we just had to mix the fruit, salad, warm up the mac n cheese, warm up the bread, and have Dane (Hope's hubby) grill the chicken she had seasoned up.
  • Massive Fruit bowl - approx 1 cantaloupe, 1 big bin of strawberries cut, 1 big bin of blueberries, and honeydew.
  • Bread loaves from the bakers simply warmed and served along side honey butter.  The honey butter was made by Hope and she mixed up regular butter (like the stick kind) and creamed honey to taste
  • Chips to keep it easy
  • Homemade mac-n-cheese prepped ahead of time
  • Salad made of greens mixed, cherry tomatoes, caramelized onions, feta, and homemade dressing (my favorite dressing is a thick balsamic with a little olive oil and some seasonings - I sometimes even just use salt and pepper for that seasoning!)
  • Chicken on the bone, simply seasoned with a mix of spices and then grilled to perfection
  • Dessert was the BOMB!  Hope and Natalie cut and sugared strawberries in advance as well as made little sweet biscuits.  Hope then made homemade cream and day off she layered these together in cute 8oz mason jars!


DRINKS:
For our drinks, we had organic lemonade, un-sweet tea, and sweet tea which Natalie properly labeled "Sweet as Braelyn" in recognition of the little guest of honor!  Oh and there was a bucket of beer, which I of course stayed away from even though I oh so badly crave beer during pregnancy...why is that!?

ACTIVITIES:
I wanted the shower to really feel more casual, like a lake day.  So rather than playing a bunch of shower games, we had croquet to play in the yard.  I meant to bring the redneck golf to play as well, but my pregnant memory failed me..wah wah! We also were going to bring cornhole, so that's another great suggestion for doing a casual shower like ours!

I mean come on...you really don't need much else when you have this:


If you want some suggestions on other more shower themed games, here's some of my favorites:

  • My Water Broke - freeze tiny babies in ice cubes, first one to thaw out has to scream "My Water Broke"
  • Chug the Bottle - we played this at the Baseball Themed shower I helped host for my friend Emily, and instead of baby bottles, I used juice boxes
  • The smelly diaper - so this one grosses me out, but is still sorta fun!  It's when you melt candies down inside something that resembles a diaper, or I guess you could use real diapers, but that's a waste of $ in my opinion.  So then the guests have to guess the candy by smell or even taste if they want!
The house where we had this shower is my father's.  Sadly he and his girlfriend were out of town when we planned this shower.  With our busy schedule and this being 6+ hours away from where Neal and I live, we had limited times we could do the shower.  However, him and Kim were so sweet and had set up a banner and provided some cute little candy packages for the guests party favors!


That's a wrap up of the shower details.  We really were so lucky to have some amazing friends host and wonderful family and friends to attend!  Neal and I couldn't be more excited about our little girl, Braelyn Abigail Bratton!

Now here's some of my favorite pictures from the pressie opening and of our friends/family who came to support us!

Bath Toys!

This card from my brother and his wife was great!  It had a ton of # as they like to tease me about my social media hastags ie:  #LakeDay #BabyShower etc :)  Thanks guys!  Love you!

Em is so cute!
 The host and her husband to be!! I HEART you two!         This is my big brother :) Love you!

my cousin's little girl is ADORABLE!

One of my oldest besties, KB!

Daddy to be rocking w/ his little girl's itty bitty socks!

iPeed onesie from KB! TOO PERFECT!

My hubby!

My good family friend, Penny and my Aunty Jo!

Some of the Chix of '06!!! Natalie, Kelly, me, Martha, Emily!


The hostess and her mom!

Another one with Kellie and the beautiful lake backdrop!

That's a wrap!!!